top of page

Unreal Engine 4 - Level Optimizing
Below are elements that appear often when working on projects.
Shader Complexity

Shaders are what take up a majority of onscreen performance, when it comes to Frame Rate performance, and overall memory usage. Shaders are complex, and there is a large range of things that can affect shader complexity.
Below are some things to watch out for.
-
Scaling of Texture Sets
-
Scaling of Asset references (Making them super small)
-
Complicated Materials (Complex operations in Material editor)
-
Shader Loops (Material Editor non-stop looping logic)
-
Translucency (Fog sheets are the biggest CULPRIT!)
-
Particle effects
Shader Complexity has a scale within the viewmode for UE4. This ranges from bright green, red, and then white. Red elements aren’t always avoidable, nor is white, in some cases. However, trying to keep your scene mostly in the green range helps tremendously.


Translucency Shaders on Foilage actors
Shader Complexity bar on bottom
Woah, calm down
Careful with overly complex Master Materials

Light Complexity
Lighting takes 2nd place when it comes to performance. Not a single scene shares the same layout for lighting, which can make it difficult if a process isn’t taken when keeping optimization in mind.
Making it “pretty” is important, but making it run smoothly is the main priority.
Below are some things that should be taken into account when lighting.
-
Make use of Static “Fill Lights” to help with ambient lighting. It’s cheap.
-
Make use of Stationary lights, but don’t overlap more than 4+
-
Toggle shadows off for Stationary lights for “Rim Lighting”
-
Don’t have too many Stationary lights on a single mesh’s surface
-
Only use Dynamic lights when absolutely needed (Stationary handles this well already)
-
Use Light Material masks for simulated/fake shadows
-
Make use of IES lighting techniques for continuity, and sizes for lights
Light Complexity also has a scale within the viewmode for UE4. Light Complexity takes the current lighting within the scene, and shows the surface(s) being affected by these. It then color codes all the assets within the scene for the viewer. This ranges from dark blue, green, and red. Red elements should be avoided as much as possible. It is also good to note that it isn’t always about shadows, but the amount of Stationary/Dynamic lights affecting surfaces.
Shadow casting Stationary lights are not always the culprit.

Light Complexity viewmode
Collision Instances
Naturally, every asset reference within a level is placed within a specific instancing group for the size of its collision. For example, ‘SM_Boulder_01’ has a single collision instance group. All boulder duplicates of this mesh are placed into that group.
However, if any of these duplicates are scaled in any way, the engine would then compile a new instance group for each one that is different. Scaling a bunch of duplicates of the same mesh would result in a huge amount of collision instances, and result in more memory usage.
It’s a good rule of thumb to have interval scales on the XYZ when working with references in the level. These intervals are usually uniform based, and in increments of 0.25, 0.5, or 1.
Don’t make unique scales that result in long decimals (X:3.454 Y:3.231 Z: 3.521)
In most cases, it would be best to duplicate the asset to reuse, or work with. Your goal is to have as few instance groups as possible.
Below are 3 meshes, a cylinder, cube and sphere. However, these has been scaled in different ways. This would result in more collision instance groups for those assets.

Lots of Collision instances for just 3 assets
Total Draw Count
Draw count is the total render amount of onscreen assets that are visible. Level layout, and level-streaming affect how many draws are on the screen, for any given area within the level. Having too many draws on the screen can lead to lower frame rates, and lag from other elements such as Shader Complexity, Light Complexity, and collision instances (they are all being rendered in high volumes which is bad).
Below are some ways to handle draw counts.
-
Level Layout, limiting visibility into other areas
-
Level Streaming/Loading via scripting or Blueprint
-
Combining Meshes into singles
-
Limit “Kitbashing” and use it when needed
-
Work with bigger shapes, and less individual detail pieces
-
Use Culling Volumes for dense areas
-
Don’t Vertex paint every mesh (Assets render twice with Vert paints)
Draw count is the most obvious element within a level, and can be approached in a straightforward manner, most of the time. Try keeping the main shapes, and necessary detail, but don’t over do it. When a Lighting pass is finished, it will actually hide most detail, and render it unnecessary.


This gives me nightmares.
Chairs, table and lamp combined
1 Mesh (not 4)
LODs
LODs, or Level Of Detail of an asset are different stages of polygon and vertex counts that are relative to the distance from the player pawn. The further the player is away, the lower, and the closer, the higher. Having poor LODs, or none at all would make your game run like a powerpoint presentation.
Below are some areas in which LODs benefit.
-
Level Skyboxes
-
Rocks in landscapes, at various distances
-
Trees and foliage pieces that are seen almost everywhere
-
Detail props that still render from medium-far distance
-
Weapons, Armor, Items that are on the ground
-
Moving/animated Pawns within dense areas (Towns, Hubs)
-
Pretty much everything in the game
LODs can be set automatically within Unreal Engine 4, without 3rd party software influence. However, the manual approach can still be taken in programs such as 3DS Max, Modo or Maya for specific LOD characteristics (Poly amount, overall shape). These would then be imported separately and added in the LOD groups for the selected mesh.


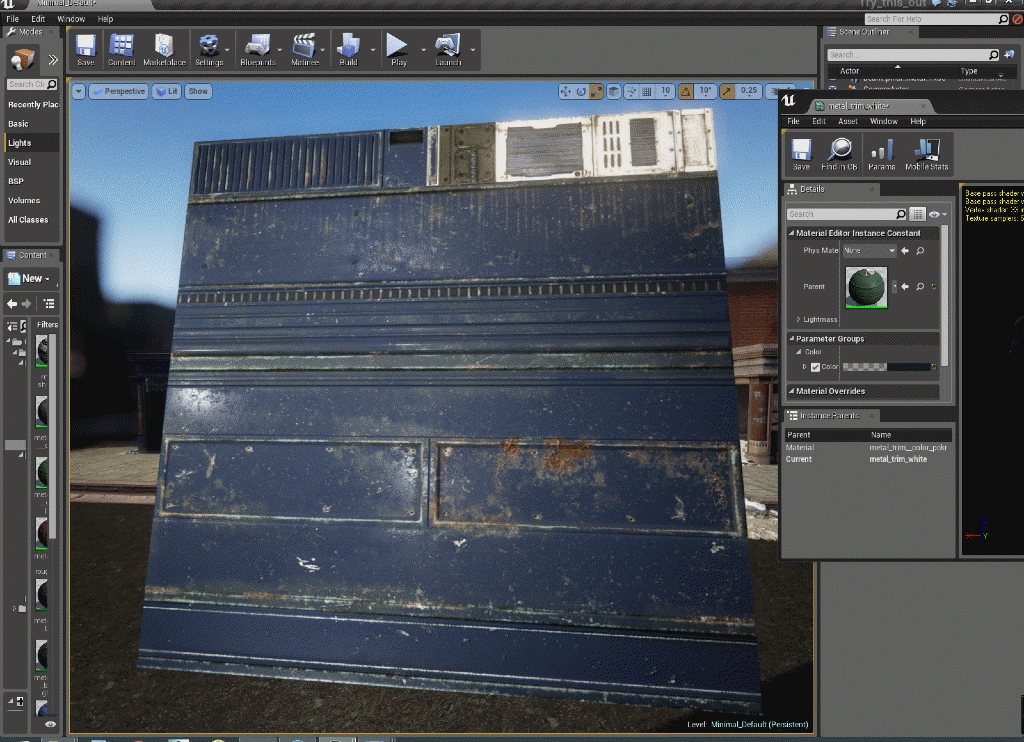
Texture Streaming
Texture Streaming is the process of taking the texture sets that Materials are composed of, and compiling them into Materials. These Textures are then streamed in the level, and can significantly take up space quite fast.
To combat this issue, UVs can be narrowed down to specific “Trimsheets”, which define the Material for a specific set of assets. Most of the time, these sheets are used for architectural pieces, such as walls, floors and ceilings.
Below are some things Trimsheets are used for.
-
Metal set (Everything metal -- rails, supports, scaffolding, vents, pipes)
-
Wall set
-
Flooring set
-
Skybox pieces
These Material Instances can be further duplicated, and changed (as long as Master has created inputs) to achieve certain colors, brightness, roughness, masks. It’s much easier to have 1-3 Material Instances funneling into 1 Master for a majority of your architecture.
If Trimsheets are not used, and every asset is baked down with unique UVs, with multiple shaders for each piece, your texture streaming pool will become overloaded.

Lightmap Density
No need for redoing everything.
Just change the Material Instances!
Division of elements on a Trimsheet
All in one place!
Every mesh within a project has a lightmap channel assigned to it. This allows for static based lighting to cast shadows which appear after baking. The lightmap density, or resolution is what gives the sharpness to the edges of the shadows.
Lightmap Density, usually doesn’t contribute heavily on performance, but can make a noticeable difference if the resolutions are too high. Most meshes use resolutions in the 32, 64, 128, 256 range, and for larger assets 512+. There are assets that go above this, depending on the details that needs to be achieved, but are not as common.
Below are some things to watch for in Lightmaps.
-
Keeping Lightmap Density as a continuous flow among the assets
-
Avoiding high resolution Lightmaps on smaller/medium meshes
-
Stay away from Automatic Lightmapping for most meshes
-
Keep the Lightmap channel the same for all assets imported
-
Avoid overlapping, or bleeding in UVs
Lightmap Density is also a viewmode within UE4. The color ranges from dark blue, green, orange and red. It is best to try and keep your entire scene within the same color range. Most scenes tend to be in the middle, around the green range.

This is the color chart based on Lightmap Density
It starts at low (Blue) and goes to high (Red)

Avoid non-continuous flow in scene
Lightmap Density
bottom of page